Coordinate Measuring Machining (CMM) is a new type of high-precision precision measuring instrument developed in the past 50 years. Its appearance on the one hand is due to the high-efficiency machining of automatic machine tools and numerically-controlled machine tools, and the need for fast and reliable measurement equipment for the processing of more and more complex-shaped parts; on the other hand, it is due to electronic technology, computer technology, and digital control technology. And the development of precision machining technology provides the technical foundation for the production of coordinate measuring machines.
The modern CMM can not only perform various complicated measurements under computer control, but also can exchange control information with CNC machine tools to realize control of processing and can also perform reverse engineering based on measurement data. At present, CMM has been widely used in machinery manufacturing, automotive industry, electronics industry, aerospace industry and national defense industry, and has become an indispensable universal measuring device for modern industrial inspection and quality control.
Due to its versatility, large measuring range, high precision, high efficiency, and good performance, it can be connected to a flexible manufacturing system and has become a large-scale precision instrument, so it is known as a "measurement center."
In the field of high-precision measurement, the CONTURA G2 product of Carl Zeiss (Germany), a well-known manufacturer, has advantages in terms of hardware and software configuration, making the continuous scanning measurement and reverse engineering measurement fully satisfied. Precision measurement requirements.
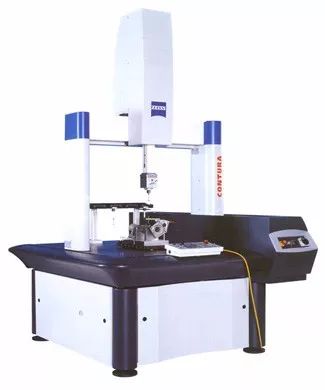
Germany ZEISS Zeiss CONTURA Series CMM
The basic working principle of coordinate measuring machine
The geometric measurement is based on the coordinate position of the point, which is divided into one-dimensional, two-dimensional and three-dimensional measurements. The basic principle of the coordinate measuring machine is to place the part to be measured into its allowable measurement space, and accurately measure the values ​​of the measured part at the three coordinate positions of X, Y, and Z. The values ​​of these points are processed by computer data. Fit to form measurement elements such as circles, spheres, cylinders, cones, surfaces, etc. Mathematical calculations yield shape, position tolerance, and other geometric quantities.
The composition and characteristics of CONTURA G2 RDS coordinate measuring machine
1) Probe system:
The probe system includes probes, suction cups, probes, reading heads, and grating scales.
2) Hardware Control System:
The C99 control cabinet, with computer-aided error correction, allows real-time dynamic correction of CMMs and sensors to ensure accurate results.
Electric drive systems, including motors, friction rollers, steel belts, belts, air cushions (air bearing), air pipes, filters, barometers, pressure regulators.
3) Other mechanical parts
Including granite countertops, three-axis guides, cushions, support bases, Z-axis balance cylinders, solenoid valves, and more.
Data processing software system (CALYPSO measurement software), which can be used to convert CAD data into measurement programs to obtain an accurate detection solution.
Application of CMM in Precision Inspection
At present, the CONTURA G2 RDS coordinate measuring machine is used to measure the flatness of the surface of the workpiece with multiple slits as shown in the figure below.
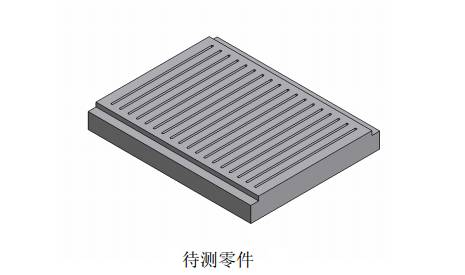
The preparation of the measurement program takes advantage of the powerful open offline programming capabilities of the Calypso measurement software. The advantage of this programming method is that the designer can design the CAD drawing file directly into the measurement software and it can be programmed. It is not necessary to wait until the machining of the workpiece is completed before the program can be measured, which greatly improves work efficiency. The second is that after the programming is completed, the program can be directly called in the CAD environment to carry out analog measurements, verify the program, find out the wrong measurement paths and sampling points in the process of running, and correct the program to make the actual measurement. The possible problems are minimized and the safety in the measurement process is guaranteed to the greatest extent.
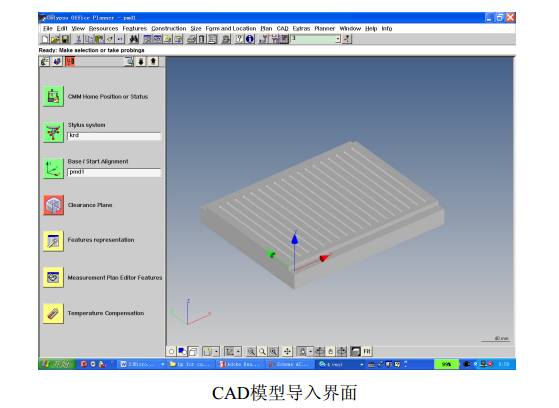
The measurement software should be set to work offline when programming offline. First, the model created in advance in the CAD environment is directly imported into the measurement software (as shown below). The measurement software uses a graphical visual interface, concise and easy to use, including basic CAD functions, such as zoom in, zoom out, pan, rotate, color (shadow) and other functions. The software's direct CAD interface applies to all important The CAD format does not cause loss of tolerance problems and accuracy.
The second step is to create a workpiece coordinate system and start measuring. The establishment of the coordinate system adopts the common face point (3-2-1), then select the Plane measurement element and double-click the plane element to set the measurement strategy. Due to the special plane to be measured, there are many slits juxtaposed above, and it is because of this that there is a possibility that the flatness will be out of tolerance. In order to obtain comprehensive and reliable measurement results, the measurement path is selected as a polyline according to the principle of breadth-average, so that the collected points are covered as much as possible to the entire plane. Use the mouse to click on the position of the desired point on the workpiece model. At this time, the position of the selected point and its vector direction will be displayed on the workpiece model. According to the needs of the measured geometric elements, multiple points can be taken. When the required number of points is collected, the point is determined in the middle point of the mining point. The system will drive the virtual probe to take points and fit the geometric elements to be measured and their graphics. The polyline measurement interface is shown below.
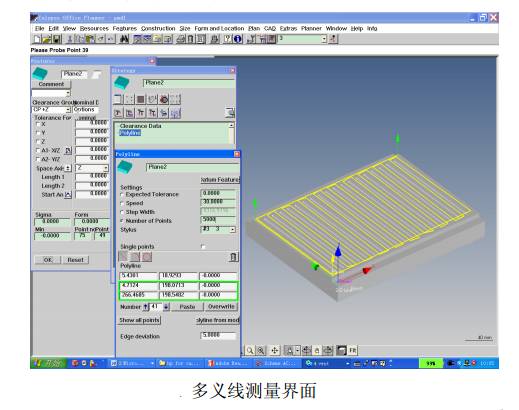
In the next step, the measurement path polyline shall be set in detail, including the setting of the probe speed and the number of collected points respectively according to the actual situation, and then the evaluation method of the plane elements shall be modified to be set as the least squares method. Select to remove gross errors and confirm.
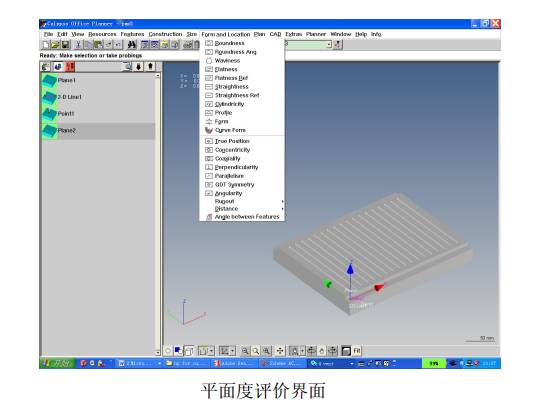
After the element measurement is completed, the geometric flatness of the measurement should be evaluated. In the menu, select the flatness in the shape and position tolerances, then double-click the flatness icon, select the measured planar element, and enter the design tolerance value to confirm the completion. Flatness evaluation interface as shown above.
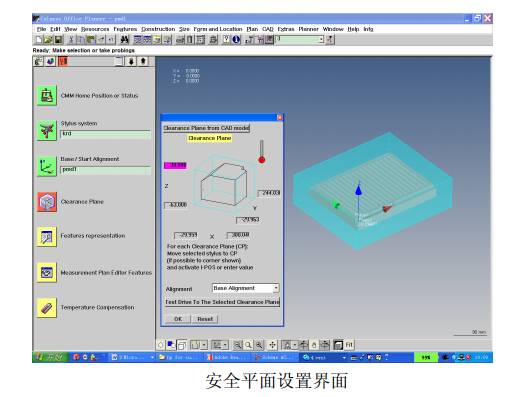
Before the measurement program is automatically run, the safety plane should be set to prevent accidental collision between the probe and the workpiece under test during actual measurement, as shown in the following figure.
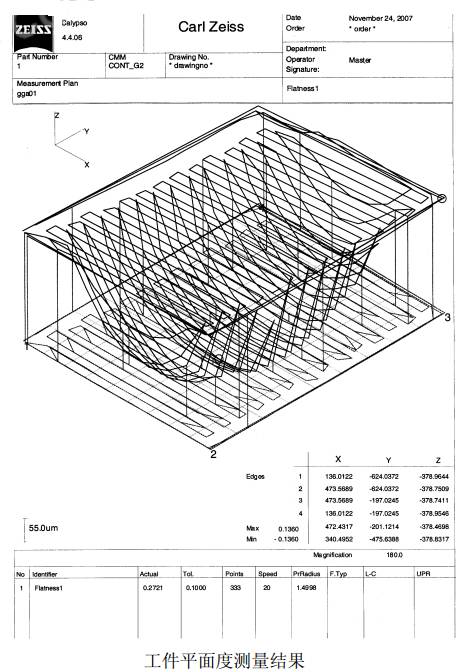
Finally, the completed measurement program is saved and the results of the flatness measurement as shown in the following figure are obtained through on-line measurement. The relevant measurement elements and coordinate values ​​and all measurement data can be intuitively obtained from the report. The user can give detailed information such as the actual size, tolerance value, deviation from the theoretical value, and out-of-tolerance conditions, etc., and define the report header itself, which can be viewed at any time after being saved.
By using the coordinate measuring machine in the measurement application of workpieces, a large amount of accurate and detailed measurement data was collected, and the functions previously unusable with other measurement workpiece plane metrics (such as knife edge ruler) were completed, and the three coordinate measurement was completed. The machine has high precision and high flexibility and excellent digital capabilities. The use of sophisticated coordinate measuring machines in the manufacture of high-quality products can reduce measurement errors, ensure the accuracy and quality of products, meet the needs of design and manufacturing, deepen understanding and better grasp its working principle and performance to complete and expand equipment. The quality inspection of precision components in development will certainly play a major role.
International Coordinate Measuring Machine Manufacturer
Hexagon Coordinates:
Hexagon's CMM is a sub-industry owned by Hexagon Group and has more than 100 branches. During the state-owned reform of the Qingdao Outpost, it sold its three-axis industry to Hexagon, which is now the Qingdao Hexagon production base. Hexagon's three-coordinate company also has DEA, Brown & Sharpe, Leitz, Romer, Cimcore, Sheffield, Starret, CEJ, Leica and other brands, covering the high school, low-end product market, and the highest market share in China.
Zeiss ZEISS, Wenzel Wenzel, Tokyo Precision, Japan Sampoong:
Both set up production bases in China, mainly in Shanghai, Suzhou and other places. The main production of small and medium-sized automated three-axis and manual three-coordinate. In the Chinese market has a certain share. Other coordinate brands:
Italy COORD3, Germany MORA (has been AEH M & A), UK LK, etc., basically agents, in the country enjoy a higher visibility, less domestic market share.
Domestic Coordinate Manufacturers
Taiwan Zhitai
Taiwanese companies established in 1996 have two production bases in Shenzhen and Kunshan. There are many product lines, including analytical instruments, three-coordinate instruments, and video apparatus series.
Xi'an Edwards
Germany AEH measures investment companies in China. The company is a professional manufacturer of coordinate measuring machines established in the mid-1990s. It mainly produces small and medium-sized production measuring machines (including CNC automatic and manual types), and its coordinate measuring machines. It belongs to the low-price series.
Qingdao Fuerdi
During the state-owned reform of Qingdao’s outpost, some senior CMM experts started their own businesses and have about 10 years of production experience. They mainly produce small and medium-sized CNC automatic and manual measuring machines, and have three-axis R&D production patents. Coordinates training base, coordinate detection base.
Beijing 303 Institute
The nature of the state-owned research institute is one of the first units in the country to study the coordinate measuring machine. The main products are aviation, measuring machines, CNC machine tools and so on.
Other agents
The coordinate measuring industry is an emerging industry in the instrumentation and meter industry. After several years of development, there are more and more trade companies that act as agents for CMMs in the country, among which the qualifications of companies are uneven, mainly acting on low-end market products.
Overall situation in the industry
1. International brands rely on their brand advantages and technological advantages to occupy the high-end market. The customer base is mostly high-end customers in the automotive industry, research institutions, aerospace and other industries.
2. Domestic manufacturers fight in the low-end market, the price war continues, agents and trading companies enter, and the market price is even more chaotic.
3. Hexagon relies on its various brand series, the length and width of its unique product line, and the high-end market is shared with Wenze and Zeiss, and the low-end market is fully covered.
As a modern large precision instrument, coordinate measuring machines have increasingly demonstrated its importance and broad prospects for development. It can conveniently measure three-dimensional space, and it can realize online detection and automatic measurement.
A portable power station is the best option if you need to juice up common personal electronics and small appliances while spending long periods of time away from household AC outlets, or if you want to have backup power ready to go in case of an emergency.
They have enough capacity to power a few small appliances for a short time. With a host of different outlets (standard 120v outlets, USB ports, and DC chargers), you can use the station to charge electronics, too. And the units often come with portable solar panels, to add more charging capabilities and extend runtime.
UPGRADED 250-WATT POWERFUL AC, USB AND 12V OUTPUTS: Comparing to similar Battery powered generators, Rockpals RP250W portable generator has upgraded the AC output to 250W continuous (300W surge max) dual AC outputs, built-in 2x USB 2.1A and 4x DC 12V ( 60W ) ports. Perfect emergency backup power for home/ travel/ camping, charging up your tablets, iPhone, iPad, laptops, fans, TV, lights and CPAP machine (*Use DC converter from your CPAP would get longer hours)
Portable Power Station,Portable power, Off-grid Power Supply, Portable Generator, Backup Camping Emergency,Backup Lithium Battery for Outdoor
Wuxi Sunket New Energy Technology Co.,Ltd , https://www.sunketsolar.com
