When you want to add your own CPU or want to update your own CPU, you have to operate the chassis and motherboard yourself. For the veteran of computer technology, if the novice encounters a completely independent installation of the CPU to the machine motherboard, what should I do? Don't worry, the following small series will give you a detailed description of the specific process of CPU chip installation in graphical form. :
CPU computer chip installation:
In installing the CPU chip, it should be noted that if the CPU is installed on a new machine, it is better to install the CPU and the memory module on the motherboard first, so as to prevent the smooth installation of the CPU due to the narrow space inside the chassis.
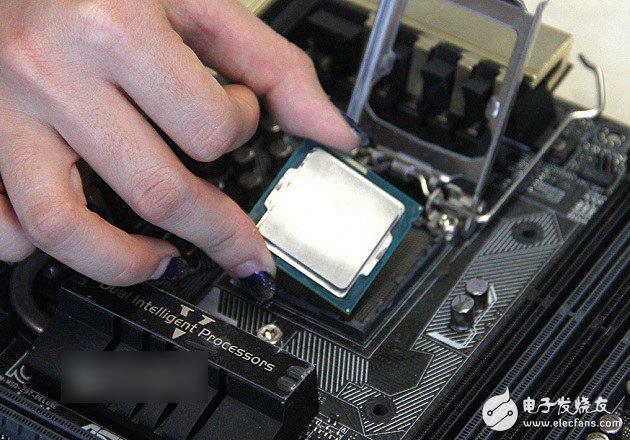
Below, we will step by step to explain the CPU installation process in detail:
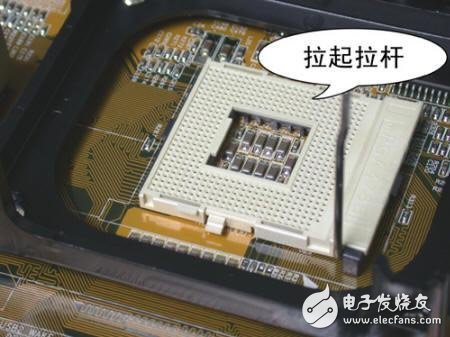
In the first step, pull the lock lever on the CPU socket slightly outward/upward at a 90-degree angle to allow the CPU to plug into the processor socket.
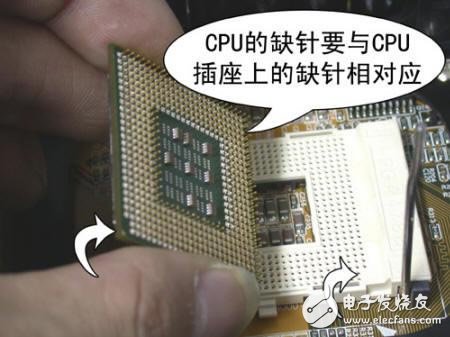
In the second step, then align the pin on the CPU with the missing pin on the socket.
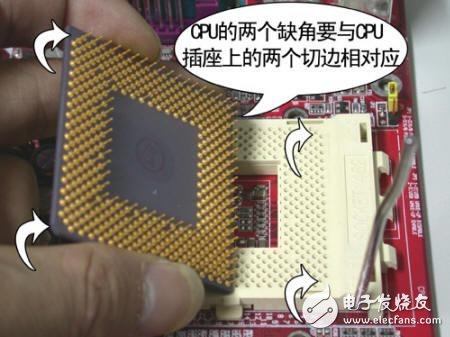
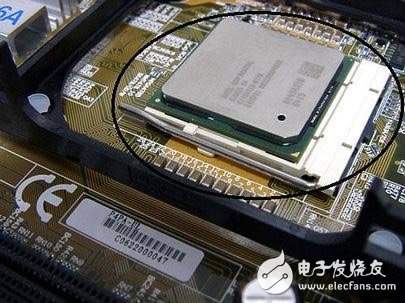
In the third step, the CPU can only be inserted into the socket when the direction is correct, and then the lock lever is pressed. (See Figure 2 - Installed CPU)
In the fourth step, evenly apply enough thermal grease (silicone grease) on the core of the CPU. But be careful not to paint too much, just apply a thin layer evenly.
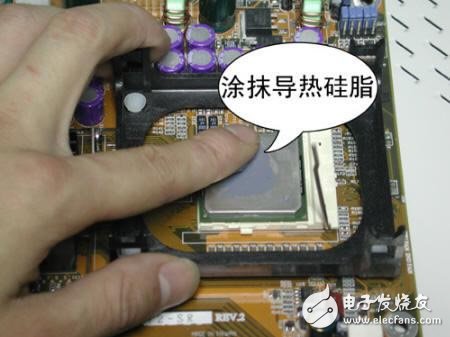
Tip: Be sure to apply thermal grease or block heat pad on the CPU. This helps to transfer waste heat from the processor to the heat sink. Failure to use thermal media on the processor can result in crashing or even burning the CPU! In addition, any slight deviations in the contact surface of the heat sink, or even a small amount of dust, can result in inefficient transfer of waste heat from the processor. . The thermal grease is also filled with tiny heat dissipation holes on the contact surface of the CPU (ie, the impression). Some manufacturers of heat sinks will have thermal grease in their products. If you don't have them, they will be sold in most computer or electronic parts stores for about $5.
The installation of the CPU is generally very simple, but the installation of the CPU fan is more complicated, and the steps are as follows:
The first step is to find the location of the CPU and its support mechanism on the motherboard, and then install the CPU.
In the second step, the heat sink is then properly positioned on the support mechanism.
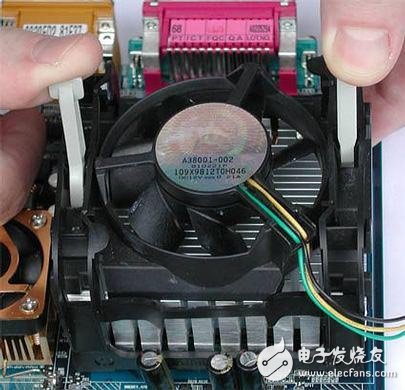
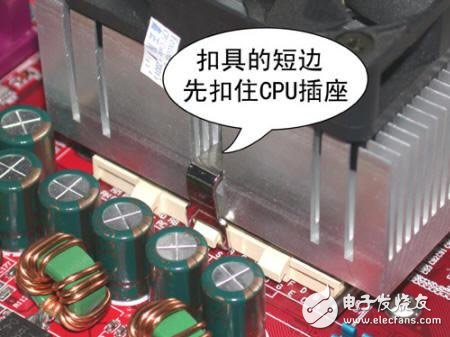
In the third step, the cooling fan is mounted on the top of the heat sink - the fan is pressed down until its four clips break into the corresponding holes of the support mechanism;
In the fourth step, the two pressure bars are pressed down to fix the fan. It should be noted that each pressure bar can only be pressed in one direction. (See Figure 3)
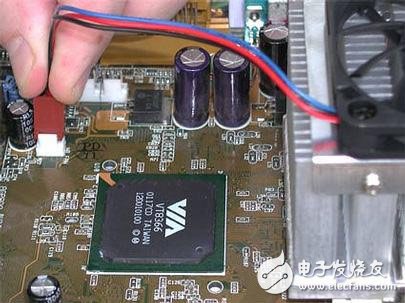
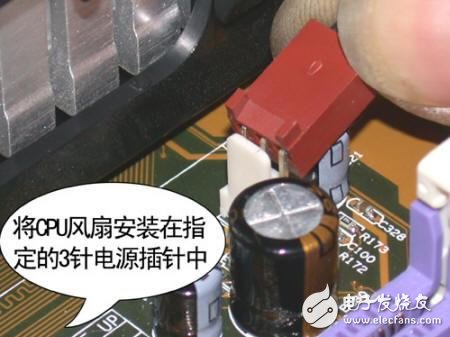
In the final step, finally connect the power cable of the CPU fan to the 3-pin CPU fan power connector on the motherboard.
If you need a set to offer your fiber optic and its connectors protection, then there may different types of fiber optic terminal boxes burst into your mind. Optical terminal box(OTB) is mounted to in and out side wall of building or pole to distribute and connect optical cable for distribution of subscriber. It is designed with controls that maintain the fiber bending radius throughout the unit on the segregated customer and provider sides.
Our fiber optic terminal box series includes cabinet, fiber splice closure, sliding rack mount fiber patch panel, wall mount Distribution Box and fiber optic surface mount box(86*86mm type). They all offer good protection either mechanical or environment to optical fiber and connectors inside. For convenient cable management, they provide termination, splicing and storage functions for Fiber Optic Cable systems.
The main material for our fiber optic terminal box is cold rolled steel with powder coating finished. If you need plastic material to keep light but solid, we have PC material products for your option. Such as our Fiber Optic Splice Closure and surface mounting box.
For different application, you can find our product accordingly. Either outdoor or indoor, either for small capacity or large capacity, either for hanging in the air or bury under the earth, either install on the wall or on the desk, you can always find there is one type suitable to you.
Fiber Optic Terminal Box,For the protective connection and storage between cables and pigtails. Supply reliable cable fixing, stripping, and grounding device; Small cubage, unique structure, easy installation.
If you need a set to offer your fiber optic and its connectors protection, then there may different types of fiber optic terminal boxes burst into your mind. Optical Terminal Box(OTB) is mounted to in and out side wall of building or pole to distribute and connect optical cable for distribution of subscriber. It is designed with controls that maintain the fiber bending radius throughout the unit on the segregated customer and provider sides.
Our fiber optic terminal box series includes cabinet, FDP, Fiber Terminal Box FTB, Fiber Optic Distribution Point Box, wall mount distribution box and fiber optic surface mount box(86*86mm type). They all offer good protection either mechanical or environment to optical fiber and connectors inside. For convenient cable management, they provide termination, splicing and storage functions for fiber optic cable systems.

Fiber Optic Terminal Boxes, Fiber Optic Distribution Point Box, Fiber Optic Cable FTTH Termination, Fiber Optic Junction Box, Fiber Access Terminal, Fiber Terminal Box FTB
NINGBO YULIANG TELECOM MUNICATIONS EQUIPMENT CO.,LTD. , https://www.yltelecom.com
