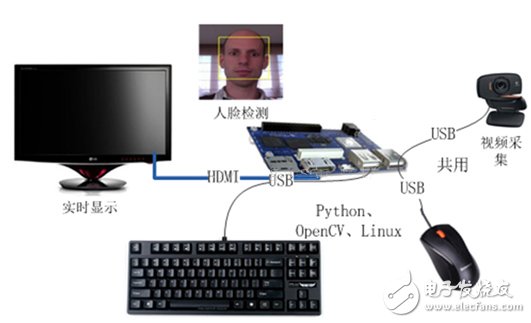
Face recognition is a very cool technology. It has a wide range of applications in mobile payment, security, entertainment and many other fields. Today, let's take a look at how to use the dragonboard 410c to realize face recognition. Here we use USB camera, connected to the Dragoboard 410c development board, running the Linux debain operating system on the development board, and implementing face recognition processing through Python scripts and OpenCV.

First, we use the Dragoboard 410c development board hardware environment to build a smart security surveillance camera, set up our own development environment, as shown above, then we can start writing our face recognition program, here is the Python cv2 library. Realize camera data collection and face recognition, the specific code is as follows:
#!/usr/bin/env python
Import cv2, sys
Import numpy as np
DEVICE_NUMBER = 0
FONT_FACES = [
cv2.FONT_HERSHEY_SIMPLEX,
cv2.FONT_HERSHEY_PLAIN,
cv2.FONT_HERSHEY_DUPLEX,
cv2.FONT_HERSHEY_COMPLEX,
cv2.FONT_HERSHEY_TRIPLEX,
cv2.FONT_HERSHEY_COMPLEX_SMALL,
cv2.FONT_HERSHEY_SCRIPT_SIMPLEX,
cv2.FONT_HERSHEY_SCRIPT_COMPLEX
]
If len(sys.argv) > 1:
XML_PATH = sys.argv[1]
Else:
Print "Error: XML path not defined"
Sys.exit(1)
# Init the Cascade Classifier
faceCascade = cv2.CascadeClassifier(XML_PATH)
# Init webcam
Vc = cv2.VideoCapture(DEVICE_NUMBER)
# Check if the webcam init was successful
If vc.isOpened(): # try to get the first frame
Retval, frame = vc.read()
Else:
Sys.exit(1)
# If webcam read successful, loop indefinitely
i = 0
While retval:
# Define the frame which the webcam will show
Frame_show = frame
If i%5 == 0:
# Convert frame to grayscale
Frame = cv2.cvtColor(frame, cv2.COLOR_BGR2GRAY)
# Detect objects and return an array of faces
Faces = faceCascade.detectMulTIScale(
Frame,
scaleFactor=1.2,
minNeighbors=2,
minSize=(50, 50),
Flags=cv2.cv.CV_HAAR_SCALE_IMAGE
)
# Draw a rectangle around the faces
For (x, y, w, h) in faces:
Cv2.rectangle(frame_show, (x, y), (x+w, y+h), (0, 0, 255), 2)
# Show the image on the screen
Cv2.imshow("DB410c Workshop #6: Facial DetecTIon", frame_show)
# Grab next frame from webcam
Retval, frame = vc.read()
# Exit program after waiTIng for a pressed key
If cv2.waitKey(1) == 27:
Break
i += 1
The above is the face recognition code implemented by the whole python. In the code, we use the machine learning of opencv, so we need a classification file. This file is described by xml file. This is the face that is provided by opencv is the classifier. It has been trained here, you can use it directly. You can go to http://pan.baidu.com/s/1milnAnY for the specific files. After downloading, put the code files in the same folder. You can also go to Opencv official website to download.
After introducing the code, we can test it. We create a new folder mkdir face_test, then create a new file face_test.py, open the file, then copy the above code to the file, save it, and then follow the above method to http:/ /pan.baidu.com/s/1milnAnY download the xml file into the folder, then use chmod 777 face_test.py to modify the permissions of the Python script, change to the executable file, then unplug the mouse to connect to the USB network The camera, you can start testing, the test run script code is as follows:
Python face_test.py frontalface_default.xml where frontalface_default.xml is the downloaded xml file, trained classifier.
After running, if you aim at the face, you can see that there is a red rectangle to mark your face, indicating that the recognition detects your face. This is specifically related to the portrait right, and does not display the demo result picture.
3D Printing Tungsten Part,Tungsten 3D Printer,3D Printing Tungsten,Tungsten 3D Filament
Shaanxi Xinlong Metal Electro-mechanical Co., Ltd. , https://www.cnxlalloys.com
